When I first saw Brandon Kopp's HDR images, I knew I had to learn this photography skill, too. A link to his main web page: http://www.brandonkopp.com/Welcome.html.
HDR stands for “High Dynamic Range”. This technique combines photos of different exposure values of the same scene to create an image with greater detail and potential clarity than seen in a single exposure photo.
Below are three images I took of the same scene, at different exposure values. My camera was handheld, not on a tripod, set to Aperture Priority, f/3.5, 18mm focal length, ISO 6400. I used the camera's bracketing feature, set at three photos, each taken at 2 exposure values from each other.
I used Photomatix (http://www.hdrsoft.com/) to first combine the three "bracketed" photos into the HDR image. Using the different ranges within the program, I pulled out light and dark elements of the over and under exposed photos, and combined them into an image with a wider range of exposure, more balanced light and dark areas. The way a person tweaks the HDR image when processing it is highly subjective. While some people might like a smoother photo of the horse below, I chose to keep more detail (and graininess) to create a more dramatic effect, with cooler temp of colors. After processing HDR images with Photomatix, I usually touch them up a bit with Photoshop CC.
I have used the HDR processing in Photoshop 6 and CC, yet still very much prefer Photomatix. Photomatix processes images more quickly than Photoshop, and also has more features for manipulating the image when processing. Here's a link to a great HDR tutorial website, with a discount for purchasing Photomatix (in right column): http://captainkimo.com/.
I remember attempting some sort of HDR processing with my old Beseler 23CII enlarger back in the '80s. This is a much easier and cheaper task with digital photography! :)
HDR stands for “High Dynamic Range”. This technique combines photos of different exposure values of the same scene to create an image with greater detail and potential clarity than seen in a single exposure photo.
Below are three images I took of the same scene, at different exposure values. My camera was handheld, not on a tripod, set to Aperture Priority, f/3.5, 18mm focal length, ISO 6400. I used the camera's bracketing feature, set at three photos, each taken at 2 exposure values from each other.
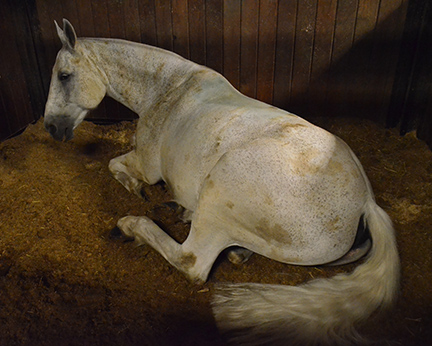 |
| Caisson Horse at Rest, normal exposure value |
 |
| Caisson Horse at Rest, +2 exposure value (overexposed) |
 |
| Caisson Horse at Rest, -2 exposure value (underexposed) |
 |
| Caisson Horse at Rest, HDR image |
It is much easier to create HDR images of still objects using a tripod than moving subjects such as animals and people, especially when hand-holding the camera. If a subject moves in between the times the photos are taken, this will create "ghosting" in the combined images. I use the bracketing feature of my camera which quickly takes three consecutive photos at a time, with set different exposure values. If I wanted to take more exposures manually (create an HDR image from more than 3 photos), I would have to do that on a tripod to produce photos that are easier to line up when processing as HDR images.
I have used the HDR processing in Photoshop 6 and CC, yet still very much prefer Photomatix. Photomatix processes images more quickly than Photoshop, and also has more features for manipulating the image when processing. Here's a link to a great HDR tutorial website, with a discount for purchasing Photomatix (in right column): http://captainkimo.com/.
I remember attempting some sort of HDR processing with my old Beseler 23CII enlarger back in the '80s. This is a much easier and cheaper task with digital photography! :)

No comments:
Post a Comment